
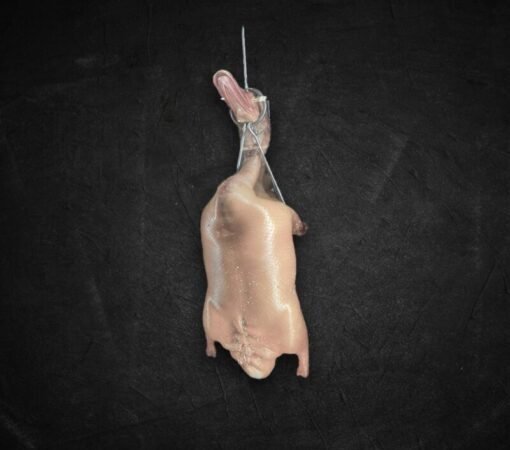
Today, we’re getting down to a very interesting procedure: dry-aging duck, which we’ll oven-roast and serve with a smooth duck jus. Dry aging duck may be daunting, but it simply includes placing a couple of open birds in your refrigerator for two weeks.
Read on to know how you break down whole ducks if you don’t know how to get your hands on duck crowns. Whole ducks can be utilized for this project if you wish to forgo the remainder of the duck project and only do the dry-aging, assuming you have enough fridge room.
Moreover, it all boils down to how much you want to put into your own culinary education and resources. To that end, here’s a comprehensive guide to see if you’re ready to try your hand at dry-aging duck.
What is the purpose of dry aging?
Dry aging duck has the purpose of drying off the skin and making it crisp (one of the elements that makes dry-brining such an appealing option for poultry in general). But there’s a lot going on beneath the surface when the duck skin dries.
Meat that has been dried stimulates the enzymatic breakdown of muscle proteins into smaller fragments, which improves flavor and texture.
Some people prefer to think of dry-aging as an exaggeration of all the qualities that make duck so delicious—dry-aged birds have crispier skin, more deeply flavored meat. And a more tender texture than their fresh-cooked counterparts. Fortunately for duck fans all over the world, the procedure is rather straightforward.
The ideal technique to dry-age birds is to hang them by their necks, allowing air to circulate all around them.
This isn’t really viable with a 12-pound prime rib that needs to be matured on a wire rack, but it’s far more doable with duck crowns that weigh roughly two pounds each. Hanging the skin allows it to dry uniformly, which is critical for consistent results.
HOW TO DRY AGE DUCK AT HOME: THE EASY WAY
The tools and the time
The best dry-aged ducks mature and tighten in around two weeks. Make place in your refrigerator or have a separate one for all your dry-aging efforts. Ducks, unlike most other meats, cannot be dried in a specific bag.
You’ll need to hang them in a very clean and cool environment. It’s also recommended that you solely dry age the duck’s ‘crown’ (which means you have to carve off the wingtips, the legs and most of the back).
A clear picture of what you want to achieve with the outcomes
When dry-aging a duck, make sure you know exactly what you’re looking for: a meat that’s very tender, low in moisture, and free of contamination. Avoid opening the storage as much as possible, but make sure it’s clean in between checks on the duck’s drying process.
The method and recipe for completing the task.
Finally, make sure you know what you’re going to do with the now extremely delicate flesh. The majority of the time, dry-aged duck crowns are used in wonderful roast breast dishes with soft, aromatic flesh and crispy skin. Once the dry-aging is complete, carve out and trim any excess fat from the breasts while also ensuring the delicate flesh is not overdone.
There is a lot to prepare in general. However, if you succeed, you can expect to impress a lot of friends and family with the feasts you prepare using this master chef technique.
A Crisp Recipe to Make Dry Aged Duck
Instead of concealing the natural flavor of a dry-aged duck with powerful marinades, this recipe lets it speak for itself. The skin of the duck should be crisp, not rubbery, and a well-seasoned cast-iron skillet is the perfect pan for the task. Cook for at least 10 minutes over high heat before adding the duck.
Ingredients
- 2 tablespoons olive oil
- 4 medium to large dry aging duck breast fillets, skin intact
- Kosher or sea salt
- Fresh seasonal vegetables, roughly chopped
- Juice of 2 lemons
- Freshly ground black pepper
Steps to follow
- In a large mixing bowl, combine the duck fillets and veggies. Season the duck and vegetables well with salt and pepper. Allow the ingredients to rest at room temperature for 20 minutes after covering the bowl with a cloth.
- In a cast-iron skillet, heat the oil over high heat. Place the duck fillets skin side down in the pan. Flip the ducks over and add the vegetables once the skin is crisp. Cook for 3 to 4 minutes more, or until the ducks reach an internal temperature of 135 to 145 degrees for medium-rare. Make sure the vegetables aren’t overcooked. Before removing the contents of the pan, whisk in the olive oil and lemon juice.
- Remove the duck fillets from the pan and set aside for 5 minutes before slicing each one into 1-inch thick slices against the grain. Season with more salt and pepper to taste.
Process Of Dry Aging Duck at An Online Butcher Shop
The dry-aging technique goes a step further at butcher in Singapore and works its magic on these Irish Ducks, producing soft, flavorful flesh while also drying off the skin. While well-done duck can be wonderful, it would be a travesty to overcook the meat after putting in all that effort and time. Dry-aged duck should not be cooked beyond medium to completely appreciate its flavor. It’s an artwork of love, aged for 30 days in a controlled environment to bring out the greatest flavors of such an amazing piece of meat.
for art work painting also visit creative art gallery.


